Neural networks have gained a lot of traction in the past years, yet have remained a machine learning technique that I have not had a chance to learn and play with until recently. One of the most popular applications of this has been the development of AlphaGo, a bot that has repeatedly bested the best humans in the world at the board game Go. There are already several good resources that explain neural networks, such as here for a blog, or here for an online textbook. In short though, neural networks are a series of layers that perform a linear function on the data from the previous layer and then a non-linear function. These networks are trained with large amounts of data, and are often used for supervised learning problems.
To work on covering this gap in my understanding, I have built a simple neural network model that can recognise hand written digits. This problem is often referred to the “Hello World” of modelling on neural networks. I originally wanted to use neural networks to develop a chat-bot that could learn to speak like others in a chat room, and while that has been done at the time of writing this article, I am starting the documentation of my adventures at the start of my learning process and will be as thorough as I can. In this article I am going to focus more on the application of the neural network to achieve my goal. To do this, a few items need to be presented.
Tensorflow
Tensorflow is an open source software library, originally produced by Google, designed for high performance numerical calculations. This library is appealing as it makes running machine learning processes on the GPU a relatively straight forward process. This is particularly appealing when developing deep learning/neural network models, as a GPU is faster than a CPU and can handle large matrix operations (which form the core of a deep learning model). While there are several libraries that allow for this to happen, the popularity of the Tensorflow library in particular means that there is good community support.
Docker
Docker is an application that ‘performs operating-system-level virtualization also known as containerization’ according to the website. This is the first time that I have worked with Docker, and it feels to me, in slightly more lay terms, like an application that sits somewhere between a virtual machine and a bash script.
The installation of everything in order to get Tensorflow to work was a real nightmare for me. Several packages need to be installed, each of which have several versions, and they have a tendency to not play well together. Docker was suggested to me (Thanks Brandon!) as an option for setting up an ‘image’ where all kinks in driver configuration have already been sorted, which means I can now have the desired environment in essentially one command now.
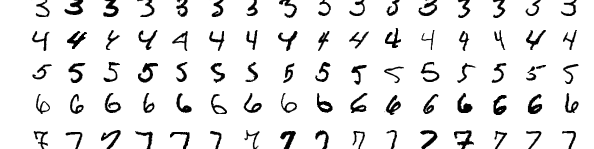
MNIST
The MNIST data set is a set of hand written digits split into a training and test groups. The data has been normalised such that each image contains only one number, and each image is the same size of 28*28 pixels. This makes the data set attractive for testing new machine learning techniques as data pre-processing and cleaning steps have already been performed.
Writing the code
This code was written (with a few minor variations, like adding another layer) while following a tutorial that was presented here. The linked tutorial is highly detailed, and is presented both in text and as a video. For those looking to get started, this was a fantastic source of information, and I found the guy relatively easy to listen to.
There are two main sections required to get this to work, defining and training the model. Again, steps like data pre-processing are not needed here as the data set has been cleaned and normalised for us. The code snippet for setting up the model is presented here. In this example I have opted for four fully connected layers, and defined how to pipe data through the model from input data (picture of a number), through the four hidden layers, to the output (classification) layer.
def nn_model(data):
    hidden_layer_1 = {'weights':tf.Variable(tf.random_normal([784, nodes_hl1])),
                      'biases':tf.Variable(tf.random_normal([nodes_hl1]))}

    hidden_layer_2 = {'weights':tf.Variable(tf.random_normal([nodes_hl1, nodes_hl2])),
                      'biases':tf.Variable(tf.random_normal([nodes_hl2]))}

    hidden_layer_3 = {'weights':tf.Variable(tf.random_normal([nodes_hl2, nodes_hl3])),
                      'biases':tf.Variable(tf.random_normal([nodes_hl3]))}

    hidden_layer_4 = {'weights':tf.Variable(tf.random_normal([nodes_hl3, nodes_hl4])),
                      'biases':tf.Variable(tf.random_normal([nodes_hl4]))}

    output_layer = {'weights':tf.Variable(tf.random_normal([nodes_hl4, num_classes])),
                    'biases':tf.Variable(tf.random_normal([num_classes]))}

    l1 = tf.add(tf.matmul(data,hidden_layer_1['weights']), hidden_layer_1['biases'])
    l1 = tf.nn.relu(l1)

    l2 = tf.add(tf.matmul(l1,hidden_layer_2['weights']), hidden_layer_2['biases'])
    l2 = tf.nn.relu(l2)

    l3 = tf.add(tf.matmul(l2,hidden_layer_3['weights']), hidden_layer_3['biases'])
    l3 = tf.nn.relu(l3)

    l4 = tf.add(tf.matmul(l3,hidden_layer_4['weights']), hidden_layer_4['biases'])
    l4 = tf.nn.relu(l3)

    output = tf.matmul(l4,output_layer['weights']) + output_layer['biases']

    return output
With the model now defined, the training process can configured, and is shown below. Here, we are trying to assign weights to the model so that we can maximise our classification rating (which is equivalent to minimising the cost). This is an iterable process, and ideally we would run it until the minimum cost had been found. However, for this example, we will just take the model as is after 20 iterations. Once the model has been trained, I had a classification accuracy of approximately 95%, which is not bad for the expended programming effort (though still nowhere near state-of-the-art accuracy).
One difference here from the tutorial site, eluded to in the code, is that I have changed how the model accuracy is calculated. When trying to do this in one go, the process crashes due to being out of memory. This solution was presented by Chin-Chang Yang at the Stack Exchange link in the code snippet. This was a strange error to sort out as I have followed the afore mentioned Tensorflow guide before, on the same machine, and did not have any issues. From what I have been able to deduce, the problem arises due tue working with Tensorflow 1.8 and/or working in a Docker environment.
def train_neural_network(x):
    prediction = nn_model(x)
    cost = tf.reduce_mean( tf.nn.softmax_cross_entropy_with_logits(logits=prediction, labels=y) )

    optimizer = tf.train.AdamOptimizer().minimize(cost)
    num_epochs = 20
    with tf.Session() as sess:
        sess.run(tf.global_variables_initializer())

        for epoch in range(num_epochs):
            epoch_loss = 0
            for _ in range(int(mnist.train.num_examples/batch_size)):
                epoch_x, epoch_y = mnist.train.next_batch(batch_size)
                _, c = sess.run([optimizer, cost], feed_dict={x: epoch_x, y: epoch_y})
                epoch_loss += c

            print('Epoch', epoch, 'completed out of',num_epochs,'loss:',epoch_loss)

        correct = tf.equal(tf.argmax(prediction, 1), tf.argmax(y, 1))
        accuracy = tf.reduce_mean(tf.cast(correct, 'float'))
        #print('Accuracy:',accuracy.eval({x:mnist.test.images, y:mnist.test.labels}))

        #The above accuracy spits the dummy and complains of running out of memory, so we
        #assess the accuracy in batches. We use the same batch size as training for simplicity.
        #c/o - https://github.com/tensorflow/tensorflow/issues/136
        batch_num = int(mnist.test.num_examples / batch_size)
        test_accuracy = 0

        for i in range(batch_num):
            batch = mnist.test.next_batch(batch_size)
            test_accuracy += accuracy.eval(feed_dict={x: batch[0], y: batch[1]})

        test_accuracy /= batch_num
        print("test accuracy %g"%test_accuracy)
Final thoughts
The biggest hassle with getting everything up and running was trying to get all the prerequisite packages installed and working together. Getting something simple like this up and running was fairly straightforwards given that I had a good community tutorial to follow. Tensorflow is fantastic for allowing a user to build models, while hiding the complex matrix math required to make the whole process work.
However, having spent some time on other projects (which will appear here when fully documented and completed), and looking over various configuration options, it seems like there are nicer ways to build and train models. One example is to use Keras, a front end API package that can work with Tensorflow. Not only does Keras have far superior documentation (Tensorflow documentation leaves a lot to be desired), but it also provides a cleaner, less error-prone interface for defining common complex models (such as LSTM’s, a model used for sequential learning, such as sentence prediction). As such, the plan from here is to repeat this tutorial example under a couple of these different configuration options, such as using Keras or writing a script in Julia. Hopefully, achieving the same objective through different implementations will provide exposure to alternate tools, and expand my understanding of neural network models even further.